Probleme mit Time Machine und APFS unter High Sierra

Auf Macs mit interner SSD wird bei der Installation von High Sierra das Filesystem auf APFS geändert. Danach funktioniert u.a. Time Machine etwas anders. Es wird zuerst ein Snapshot angelegt, von dem dann das Backup gesichert wird. Nach erfolgreichem Backup sollte der Snapshot eigentlich wieder entfernt werden.
Das scheint nicht immer zu funktionieren. Bei mir wuchs unter macOS 10.13.2 die Zahl der Backups so lange, bis die interne SSD voll war. Ich gehe davon aus, dass das ein Bug ist, der in einem Update behoben wird. In der Zwischenzeit helfe ich mir mit diesem Shellscript:

% cat bin/tm-cleanup.sh
#!/bin/bash

mount | grep "Macintosh HD"| cut -f 1 -d' ' | xargs \ 
-n 1 umount

tmutil thinLocalSnapshots / 10000000000 4

Wenn man das Script mit

sudo bin/tm-cleanup.sh

aufruft, werden alle noch gemounteten Snapshots entmountet und danach entfernt.

NB: das funktioniert so nur, wenn die interne SSD den Namen „Macintosh HD“ trägt, was der Default ist. Ggf. muss der Name im Script angepasst werden.
sshblack under macOS Sierra

When you run a computer that is SSH-enabled and open to access from the internet, you should use safe passwords (or even better: private key authentication) and a restrictive sshd.conf. But even with that, the barrage of malicious connection attempts can cause performance issues.

I have been using sshblack for many years on my Mac to battle that issue: when an IP address makes multiple failed attempts to login, it gets banned for a while. The popular fail2ban does that for Linux systems, but it doesn’t work on Mac OS X/macOS.

sshblack always needed some hand-holding with new OS releases, but with Sierra there was an entirely new challenge: there are no log files for sshd anymore! In previous versions, sshblack would look in /var/log/system.log for failed login attempts. The file still exists, but most logging in Sierra uses Apple’s new Unified Logging and Tracing System. That means the only way to access logging for sshd is either Console.app or the log CLI command. Using log with its stream parameter to get real-time logging data incurs a huge performance penalty, so the only way to go seems to be log show. So instead of tailing a log file, the script now has this definition:

my ($LOG) = ‚/usr/bin/log show –style syslog –last 1m |‘;

I added a sleep 60 statement to the loop and removed the code meant to deal with log rotation. Seems to work fine.

Sendmail and dual-stack IPv6

We’ve been using IPv6 for a few years, but for various reasons we hadn’t yet prepared our sendmail MTAs to use the new protocol. We run a dual-stack environment, so all servers need to use both IPv4 and IPv6. According to sendmail’s documentation it should be possible to use the host name for both daemons, so initially we tried it like that in our .mc file:

DAEMON_OPTIONS(`Name=MTA-v4,Family=inet,A=smtp-out.rrz.uni-koeln.de,M=fh')
DAEMON_OPTIONS(`Name=MTA-v6,Family=inet6,A=smtp-out.rrz.uni-koeln.de,M=fh')
DAEMON_OPTIONS(`Port=smtp,Addr=127.0.0.1, Name=MTA')
CLIENT_OPTIONS(`Name=MSA-v4,Family=inet,A=smtp-out.rrz.uni-koeln.de,M=h')
CLIENT_OPTIONS(`Name=MSA-v6,Family=inet6,A=smtp-out.rrz.uni-koeln.de,M=h')

That worked fine on a test system, but for reasons unknown it failed on our actual production server. It resulted in these error messages:

Mar 23 10:35:39 smtp-out.rrz.uni-koeln.de sendmail[6662]: NOQUEUE: SYSERR(root): opendaemonsocket: daemon MTA-v6: cannot bind: Address already in use
Mar 23 10:35:39 smtp-out.rrz.uni-koeln.de sendmail[6662]: daemon MTA-v6: problem creating SMTP socket
Mar 23 10:35:39 smtp-out.rrz.uni-koeln.de sendmail[6662]: NOQUEUE: SYSERR(root): opendaemonsocket: daemon MTA-v6: server SMTP socket wedged: exiting

We have now implemented a workaround: instead of the hostname we use the actual IPv6 address for the IPv6 daemon and client:

DAEMON_OPTIONS(`Name=MTA-v4,Family=inet,A=smtp-out.rrz.uni-koeln.de,M=fh')
DAEMON_OPTIONS(`Name=MTA-v6,Family=inet6,A=IPv6:2a00:a200:0:12::25,M=fh')
DAEMON_OPTIONS(`Port=smtp,Addr=127.0.0.1, Name=MTA')
CLIENT_OPTIONS(`Name=MSA-v4,Family=inet,A=smtp-out.rrz.uni-koeln.de,M=h')
CLIENT_OPTIONS(`Name=MSA-v6,Family=inet6,A=IPv6:2a00:a200:0:12::25,M=h')

One more tip: with an IPv4-only setup we used the ‚b‘ flag (use the incoming interface for sending the message) as modifier for the DAEMON_OPTIONS, but with dual-stack that doesn’t work: if you receive a message via IPv4 but have to send it via IPv6 (or vice versa), it will fail.

Update bezüglich Microsoft Excel für Mac und ODBC-Zugriff auf MySQL-Server

Das Folgende ist ein Update für diesen alten Artikel. Ich nutze mittlerweile Microsoft Excel 15 für Mac und El Capitán. Microsoft Query ist kein eigenes Programm mehr, sondern es öffnet sich ein Fenster innerhalb von Excel, das diesen Namen trägt. Dabei handelt es sich im Gegensatz zu früher um ein 32-Bit-x86-Programm. Deshalb muss man nicht mehr mühevoll ein fat binary erzeugen, dafür gibt es neue Probleme. Da ich nirgendwo einen Artikel zu diesem Thema finden konnte, dachte ich mir, dass ich so vielleicht mindestens einer weiteren Person auf dem Planeten helfen kann.

Neben Excel braucht man:

  • die 32-Bit-Version des freien MySQL-ODBC-Connectors (Plattform Mac OS X, Mac OS X 10.7 (x86, 32-bit), DMG Archive, aktuelle Version: 5.3.4)
    NB: man muss den Installer per Rechtsklick öffnen, weil er nicht signiert ist.
  • den ODBC-Manager

Nachdem man beide Pakete installiert hat, muss man zunächst den Connector verschieben oder kopieren. Der Installer installiert ihn nach /usr/local/lib. Wenn man den Connector dort lässt, kann Excel ihn nicht öffnen. Im Systemlog findet man diesen Hinweis:

sandboxd[160] ([45299]): Microsoft Excel(45299) deny file-read-data /usr/local/lib/libmyodbc5w.so

Excel hat über seine Sandbox also keine Leserechte auf das Verzeichnis. Security kann so lästig sein 😉

Dieses Problem kann man im Terminal wie folgt beheben:

$ sudo cp -p /usr/local/lib/libmyodbc* /Library/ODBC/

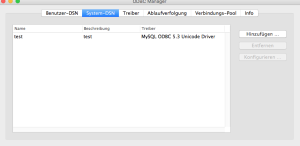
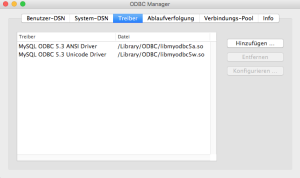
Wenn man danach den ODBC-Manager (im Ordner Dienstprogramme) startet, sollte man so etwas im Treiber-Tab anlegen:

ODBC-Treiber

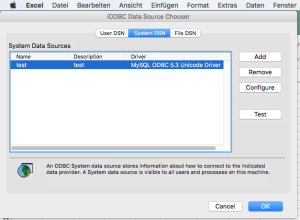
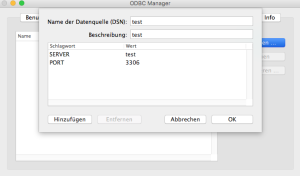
Danach muss man für die gewünschte MySQL-Verbindung einen System-DSN anlegen:

DSN anlegen

DSN bearbeiten

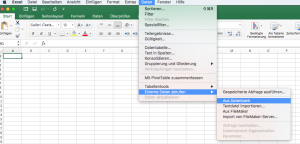
Diese Verbindung kann man danach in Excel verwenden:

Datenbankabfrage einfügen

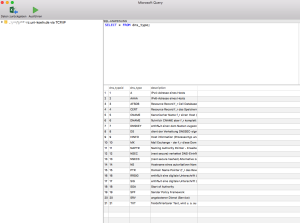
Microsoft Query

Microsoft Query

Cisco RTMT v8 on Mac OS X

This article expands on a topic others have written about before, i.e. running Cisco’s RTMT for the Cisco Call Manager on a Mac:

Both of these deal with earlier versions of RTMT. Please read at least Ciscomonkey’s article, because I’m not repeating the hints regarding the timezone issue here.

I found that it doesn’t work as easily using RTMT v8, specifically 8.92. Here’s what you have to do to get that version to run on your Mac:

  1. Install the Linux version in a Linux VM
  2. Copy the installation directory (usually that’s /opt/Cisco/Unified-Serviceability/JRtmt/) to your Mac (e.g. to /Applications/)
  3. Edit the file JRtmt/run.sh so that it uses /usr/bin/java instead of trying to start the bundled JRE (which is a Linux binary)

At this point you can launch RTMT by invoking run.sh from a terminal, but for additional convenience you can write yourself a GUI launcher. The basics are described in the article I linked to, but I added logging the output:

do shell script "cd /Applications/JRtmt; ./run.sh 2>&1|logger -t 'Jrtmt'"

Of course you’ll have to adapt the path to the location where you installed the directory. Now you can just double-click the AppleScript app, and RTMT’s output will be logged to Console.app.

AirPrint-Erfahrungen

Seit einiger Zeit (ab Version 4.2.1) können iOS-Geräte wie z.B. iPads und iPhones drucken. Der offizielle Weg funktioniert aber nur in Heimnetzwerken und mit wenigen Druckermodellen. Im Netz kursieren viele Anleitungen, wie man diese Beschränkung umgehen kann. Was ich hier darstelle, ist nicht neu, sondern nur ein Erfahrungsbericht über die Fallstricke, die einem begegnen können. Der beste Ausgangspunkt für eigene Versuche, den ich gefunden habe, ist dieser Blogeintrag. Insbesondere die dort aufgelisteten Links sind sehr hilfreich.

Auf die grundsätzlichen Dinge, wie die Konfiguration von CUPS und das Erstellen der Servicerecords im DNS, gehe ich hier nicht ein. Das ist an anderer Stelle (s.o.) schon zur Genüge getan. Folgende Probleme hatte ich zunächst:

  • Farbausdruck ging nicht
  • Druck aus Safari ging nicht

Das letztere Problem wurde, wie man im CUPS-Log (mit debug-Logging) sehen konnte, dadurch ausgelöst, dass das zu druckende Dokument als URF-Image geschickt wurde. URF ist ein „raster image format“, für das Apple den MIME-Typ image/urf verwendet, das aber leider nirgends dokumentiert ist. Eigentlich sollte URF in meinem Fall nicht verwendet werden, weil ich (gemäß den Anleitungen) urf=none deklariert hatte. Ich hielt das für ein möglicherweise neues Problem und habe deshalb nach Lösungen zum Drucken von URF gesucht. Es sei hier schon verraten: das war eine falsche Fährte. Dennoch folgt ein kurzer Exkurs zum Drucken von URF.

Frühere Versionen von Mac OS X hatten einen CUPS-Filter namens urf2pdf, mit dem das Drucken von URF möglich war. Mit dem Update auf 10.6.5 hat Apple diesen Filter gelöscht, man findet ihn aber noch im Netz. Wenn man den (mit den richtigen Permissions, also root:wheel als owner/group) installiert, und in den CUPS-Einstellungen den MIME-Type image/urf aktiviert, klappt das tatsächlich – aber nur unter Mac OS X. Ich habe keine Möglichkeit gefunden, CUPS unter Linux beizubringen, mit URF umzugehen.

Das zweite Problem war, dass alle Ausdrucke schwarzweiß waren, obwohl im Servicerecord für den Drucker Farbfähigkeit annonciert war. Wie ich jetzt weiß, war beider Rätsel Lösung offenbar identisch: Tippfehler im Servicerecord. Beim Studium der „Bonjour Printing Specification“ von Apple fiel mir auf, dass ich ein (ganz anderes) Attribut falsch geschrieben hatte. Nachdem ich alles entsprechend angepasst hatte, gingen auf einmal Farb- und Duplexdruck. Es sieht so aus, als ignoriere der Parser alle Attribute nach einem falsch geschriebenen. Deshalb wurde auch mein urf=none nicht ausgewertet. Mit der korrigierten Fassung geht jetzt auch ein CUPS-Server unter Linux, weil die iOS-Geräte jetzt alle Druckjpbs als PDF schicken.

Fazit: wie so oft in der IT können kleine Ursachen große Auswirkungen haben.

Not so S.M.A.R.T.?

Today I sent the following question to Alsoft’s (DiskWarrior) support:

„I noticed entries like this one in my system.log:

May 31 10:11:53 tyrion
/Applications/DiskWarrior.app/Contents/MacOS/DiskWarriorDaemon[932]: [Thu May 31
10:11:53 CEST 2012] : The spare blocks for ATA device 'ST31000528ASQ', serial
number '6VP319CR', appear to be exhausted. (Total Available: 36) (Use Attempts:
229)

I have researched the issue and was surprised that the DiskWarrior manual
doesn’t mention this at all. There is some anecdotal evidence on the web that a
message like that is an indicator for impending drive failure.

So I installed smartmontools, because I wanted to know more details about the
drive’s state. Here’s the relevant output I got:

sudo smartctl -A disk0
smartctl 5.42 2011-10-20 r3458 [i386-apple-darwin10.8.0] (local build)
Copyright (C) 2002-11 by Bruce Allen, http://smartmontools.sourceforge.net

=== START OF READ SMART DATA SECTION ===
SMART Attributes Data Structure revision number: 10
Vendor Specific SMART Attributes with Thresholds:
ID# ATTRIBUTE_NAME          FLAG     VALUE WORST THRESH TYPE      UPDATED  WHEN_FAILED RAW_VALUE
1 Raw_Read_Error_Rate     0x000e   106   099   006    Old_age   Always       -       11960322
3 Spin_Up_Time            0x0003   100   100   000    Pre-fail  Always       -       0
4 Start_Stop_Count        0x0032   100   100   020    Old_age   Always       -       33
5 Reallocated_Sector_Ct   0x0033   082   082   036    Pre-fail  Always       -       741
7 Seek_Error_Rate         0x000f   084   060   030    Pre-fail  Always       -       246300939
9 Power_On_Hours          0x0032   078   078   000    Old_age   Always       -       19671
10 Spin_Retry_Count        0x0013   100   100   097    Pre-fail  Always       -       0
12 Power_Cycle_Count       0x0032   100   100   020    Old_age   Always       -       44
184 End-to-End_Error        0x0032   100   100   099    Old_age   Always       -       0
187 Reported_Uncorrect      0x0032   100   100   000    Old_age   Always       -       0
188 Command_Timeout         0x0032   100   100   000    Old_age   Always       -       0
189 High_Fly_Writes         0x003a   100   100   000    Old_age   Always       -       0
190 Airflow_Temperature_Cel 0x0022   046   042   045    Old_age   Always   In_the_past 54 (1 165 58 35 0)
194 Temperature_Celsius     0x0022   054   058   000    Old_age   Always       -       54 (0 9 0 0 0)
195 Hardware_ECC_Recovered  0x001a   034   021   000    Old_age   Always       -       11960322
197 Current_Pending_Sector  0x0012   100   100   000    Old_age   Always       -       0
198 Offline_Uncorrectable   0x0010   100   100   000    Old_age   Offline      -       0
199 UDMA_CRC_Error_Count    0x003e   200   200   000    Old_age   Always       -       0

From my understanding of the manpage, the actual count of reallocated blocks (as
given by attribute 5) is 741, and the „value“ of 82 is still well above the
critical threshold of 36. What’s more, the attribute 197 shows there are zero
„current pending sectors“, which I understand to mean that all reallocation
requests could be satisfied so far. This seems to run counter to the output of
DiskWarriorDaemon. Could you please explain the discrepancy? Should I replace
the drive after all?“

Their reply was short: „You should replace this hard drive.“

That’s fine (I should be able to replace the drive under AppleCare), but a little low on details. Can anyone explain to me why the output of smartctl seems to be so different? Where do DiskWarrior’s numbers come from?

OpenAFS 1.7.1 und die Windows-Firewall

Seit heute gibt es die neue OpenAFS-Version 1.7.1, die insbesondere für neuere Windows-Versionen dringend empfohlen ist. Allerdings gab es direkt nach der Installation noch ein paar Probleme:

Man muss leider noch von Hand die Windows-Firewall passend konfigurieren, wenn man als Netzwerkumgebung *nicht* public/öffentlich konfiguriert hat:

Systemsteuerung->
System und Sicherheit->
Windows Firewall->
Ein Programm oder Feature durch die Windows-Firewall zulassen

Dort muss für „AFS CacheManager Callback (UDP)“ das Häkchen bei „Heim/Arbeit (Privat)“ gesetzt sein.

Wenn der lokale Username und das Passwort nicht mit dem im AFS übereinstimmen, muss man sich außerdem auf anderem Weg ein Token besorgen. Dazu öffnet man die Eingabeaufforderung und gibt dort

klog username

an, wobei „username“ durch den Usernamen im AFS zu ersetzen ist.

Perl-Modul SAVI-Perl mit aktueller Sophos-Version für Linux verwenden

Wir betreiben neben Ironport für die zentralen Mailserver noch eine weitere Anti-Spam- und Anti-Viren-Infrastruktur als „Altlast“ für Institute, die keinen LDAP-Server betreiben. Dort wird als Anti-Virus-Software seit vielen Jahren ClamAV und Sophos Antivirus eingesetzt. Für Letzteres musste jetzt ein Update installiert werden, weil die alte Version demnächst nicht mehr unterstützt wird. Sophos wird bei uns mit dem Perl-Modul SAVI-Perl in amavisd-new eingebunden. Das ging nach dem Update zunächst nicht mehr, obwohl ich das Modul gegen die neue Sophosversion gebaut hatte. Die Ursache ist, dass sich der Pfad der .vdl- und .ide-Dateien geändert hat. Zwar kann man SAVI-Perl beim Kommando load_data diesen Pfad übergeben, aber (unsere Version von) amavisd-new unterstützt das nicht. Die einfachste Lösung war deshalb ein symbolischer Link vom aktuellen Pfad /opt/sophos/lib/sav auf den bisherigen Pfad /opt/sophos/sav.

Uni Köln spricht IPv6

Seit gestern, dem 2.2.2011, ist das Netz der Uni Köln über IPv6 mit dem Internet verbunden. Die Konnektivität, das sogenannte Peering, erfolgt dabei wie auch beim herkömmlichen IPv4-Anschluss über NetCologne. Praktische Auswirkungen hat das im Moment noch nicht, da wir IPv6 derzeit nicht im Campus routen, es also noch nicht in den produktiven Netzen zur Verfügung steht. Aber der erste Schritt ist gemacht, und wir planen bereits die nächsten.

Das „Prefix“, über das die Uni mit IPv6 erreichbar ist, lautet:

2A00:A200::/48